
The Hidden Bottleneck Behind an Inefficient Foot Strike
Many runners try to improve their form by consciously forcing a forefoot or midfoot landing. The intention is understandable, but the strategy often creates more tension than efficiency. A runner who reaches for the forefoot may overload the calves and Achilles tendon, while someone who attempts to hold a rigid midfoot position can lose the relaxed ankle movement needed to absorb impact. Foot strike is not an isolated technique that can be imposed successfully through willpower alone. It is the visible result of how the ankle, foot, knee, hip, trunk, speed, footwear, and fatigue interact, a perspective supported by an Authoritative Source.
The more useful target is ankle dorsiflexion, the ability of the ankle to allow the shin to move forward over the foot. This movement gives the lower leg room to accept load after contact, while the foot adapts to the ground and the calf complex stores and returns elastic energy. When the ankle is stiff, the tibia cannot progress smoothly, so the body searches for motion elsewhere. The heel may lift early, the arch may collapse, the stride may shorten, or the runner may land with unnecessary tension. Restoring useful range does not dictate a particular foot strike. Instead, it gives the body more options to organize contact naturally.
The Kinetic Ripple Effect of Poor Dorsiflexion
Restricted dorsiflexion changes the way force travels through the entire lower limb. If the ankle cannot bend as the body moves over the planted foot, the calf may attempt to control the movement under higher tension. The Achilles tendon can then experience a less favorable combination of tensile load and compression, particularly near its attachment to the heel. The plantar fascia may also be asked to stabilize the foot when the ankle and big toe are not moving well together. This does not mean limited mobility automatically causes injury, but it can reduce the margin for error when training volume, hills, speed, or fatigue increase.
There is also a trade-off between gaining motion through the ankle and forcing movement into a painful end range. During running, some dorsiflexion is essential, yet aggressively driving the heel downward or stretching into a pinch can irritate sensitive tissues. Insertional Achilles symptoms are especially relevant because compression at the tendon”s attachment can contribute to pain. Runners with persistent heel pain should not assume that more stretching or deep heel drops are always appropriate. A gradual loading plan, temporary modification of hills and speed, and assessment by a qualified clinician may be safer than trying to force range quickly.
Biomechanical evaluations confirm that restricted ankle range of motion can alter load transmission and compensatory movement strategies across the lower limb, as demonstrated in a biomechanical study of landing mechanics. The practical lesson is not that every runner needs identical ankle measurements. It is that the foot, ankle, knee, and hip share the job of managing ground reaction forces. When one joint loses usable motion, another area often has to provide compensation.
| Movement area | More unrestricted mechanics | Common effects of restriction |
|---|---|---|
| Ankle and tibia | The shin progresses smoothly over the foot while the calf controls the descent. | Early heel lift, a blocked feeling, or excessive calf tension. |
| Foot and arch | The foot adapts to the surface, then becomes a stable lever for propulsion. | Excessive pronation, a rigid landing, or reduced shock absorption. |
| Knee | The knee bends and tracks in line with the second toe. | Altered knee alignment or increased demand on the knee extensor system. |
| Hip and trunk | The pelvis remains controlled as the body moves forward over the stance leg. | Extra hip motion, a forward trunk lean, or a shortened stride. |
| Push-off | The calf, Achilles tendon, big toe, and forefoot contribute in sequence. | Reduced elastic return and greater effort from surrounding tissues. |
The Five-Minute Knee-to-Wall Self Assessment
A simple knee-to-wall test provides a useful snapshot of functional dorsiflexion without requiring specialist equipment. Bare feet are preferable because shoes can hide heel movement and change the angle of the foot. Use a wall, a ruler or tape measure, and enough space to compare both sides. The test is not a diagnosis, and a passing distance does not guarantee efficient running mechanics, but it can reveal a clear side-to-side difference or a restriction worth investigating.
- Stand facing a wall with the tested foot pointing straight ahead. Place the toes a short distance from the wall and keep the heel firmly grounded.
- Drive the knee forward until it touches the wall. If it cannot reach without the heel lifting, move the foot closer. If it touches easily, move the toes farther away and repeat.
- Measure the greatest distance between the big toe and the wall while the knee reaches forward and the heel remains down. Record the result for each side.
- Repeat two or three times, then compare the best controlled measurement rather than a rushed attempt.
Watch the quality of the movement as closely as the distance. A heel that rises, an arch that collapses dramatically, or a knee that dives inward can make the result look better while shifting the work to another structure. The knee should travel generally in line with the second or third toe, and the foot should remain connected to the floor. A pinching sensation at the front of the ankle, sharp pain around the Achilles, or pain under the foot is a reason to stop rather than push harder.
There is no universal pass-fail number that predicts running injury for every athlete. Many practitioners use roughly 8 to 10 centimetres as a practical field reference, but body proportions, foot shape, previous injury, and testing technique all affect the result. The most valuable comparison is often between left and right. A clear asymmetry, especially when paired with recurring one-sided calf, shin, knee, or Achilles symptoms, deserves attention. Retest under the same conditions every four to six weeks to see whether mobility work is improving control rather than merely increasing a measurement.
Four Targeted Mobility Drills to Unlock Ankle Play
These drills address different parts of the ankle-foot system. They should feel controlled and purposeful, not like a contest to reach the deepest possible position. Begin with a small dose, particularly if there is a history of Achilles pain, ankle sprains, plantar fascia symptoms, or surgery. Stop if pain becomes sharp, worsens with each repetition, or is noticeably worse the next morning.
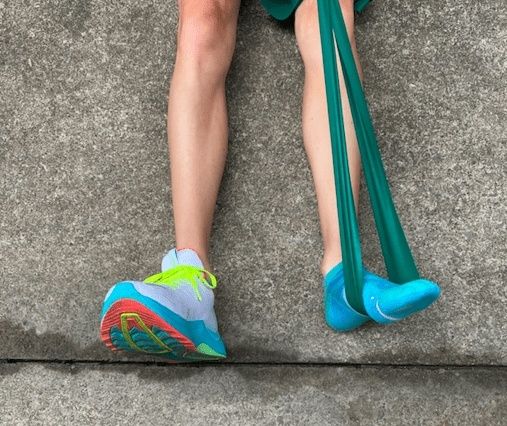
- Half-kneeling banded talocrural mobilization. Secure a resistance band low behind the ankle so it gently draws the talus backward. Take a half-kneeling position with the front foot flat, then guide the front knee toward the second toe without allowing the heel to lift. Perform 8 to 12 slow repetitions per side. The band should create a mild gliding sensation, not a painful tug. This drill is particularly useful when the front of the ankle feels blocked during the knee-to-wall test.
- Controlled eccentric heel drops. Stand on a stable ledge with the forefoot supported and the heels free, using a rail for balance. Rise with both feet, shift weight to one side, and lower the heel slowly over three to four seconds. Complete 6 to 10 repetitions per side for one or two sets. The emphasis is controlled calf loading, not forcing the heel into a deep stretch. Runners with insertional Achilles pain should avoid dropping below the level of the step unless a clinician has specifically approved that range.
- Soleus-biased wall glides. Face a wall with one foot forward and the rear heel grounded. Bend both knees slightly and glide the front knee forward over the toes while keeping the heel down. Pause briefly, then return to the starting position. The bent-knee angle places more emphasis on the soleus, which plays a major role in controlling tibial progression during running. Use 10 to 15 smooth repetitions per side, keeping the foot tripod stable.
- Great toe extensions. Stand with the foot flat or sit and gently extend the big toe while keeping the other toes relaxed. In a standing version, maintain contact through the heel and the base of the little toe as the big toe bends upward. Hold for two to three seconds and repeat 8 to 12 times. Big-toe motion supports the windlass mechanism, which helps the arch become a more effective lever during push-off. If the joint is painful, visibly enlarged, or severely restricted, seek an assessment instead of forcing the stretch.
These exercises work best as part of a broader plan that includes calf strength, balance, gradual running progression, and suitable footwear. Research examining dynamic lower-extremity preparation suggests that targeted protocols can influence elastic return, tendon stiffness, and running economy, although responses naturally vary between individual athletes. Mobility is therefore not a magic shortcut. It is one component of restoring the ability to accept, store, and redirect force.
Keep the intensity modest at first. A runner who completes aggressive heel drops after a hard session may simply add more fatigue to an already overloaded tendon. In contrast, a few controlled repetitions before an easy run can improve awareness and prepare the joints for movement. If pain persists, changes gait, or appears at rest, professional guidance is more appropriate than continuing to experiment.
Integrating Mobility into Your Daily Warm-Up Routine
Static stretching immediately before fast running is not always the best preparation. Long, intense holds can temporarily reduce the sense of stiffness that helps a tendon transmit force, and they may leave the runner feeling less springy. A dynamic sequence is usually more practical before training because it raises temperature while rehearsing the ranges and coordination needed for the session. Static stretching can still have a place after training or in a separate mobility session, provided it is comfortable and appropriate for the individual.
- Begin with 30 to 45 seconds of easy ankle circles and marching to raise awareness and temperature.
- Perform 8 to 10 half-kneeling banded mobilizations per side.
- Complete 10 soleus-biased wall glides per side, moving slowly through a comfortable range.
- Add 8 controlled calf raises or eccentric heel drops per side, avoiding painful end-range compression.
- Finish with 8 great toe extensions per foot, followed by 30 to 60 seconds of easy jogging, skipping, or brisk walking.
This sequence can fit into approximately five minutes before an easy run, but it should not replace a gradual running start. The first several minutes of the workout should still be relaxed, allowing the calf and Achilles complex to warm progressively. On speed or hill days, add a few controlled running drills only if they are already familiar and symptom-free. The goal is to arrive at the main session prepared, not fatigued.
For lasting change, frequency matters more than occasional intensity. A short mobility routine can be performed most days, while loaded calf work may need 48 hours between harder sessions, depending on training age and symptoms. Begin with two or three structured sessions per week and use lighter movement on other days. Reassess the knee-to-wall test monthly, but also track practical signs such as reduced morning stiffness, smoother downhill walking, a quieter landing, and improved tolerance of normal training volume.
Transform Your Running Form from the Ground Up
An efficient foot strike is usually an outcome, not a pose. When the ankle can dorsiflex, the tibia can progress, the foot can adapt, and the calf complex can manage load without unnecessary guarding. That freedom allows the body to select a landing pattern suited to speed, terrain, footwear, and fatigue. Trying to force a particular strike before addressing the underlying restriction often replaces one problem with another.
Start with the knee-to-wall assessment, choose the drills that match the limitation, and apply them consistently at a tolerable level. Protect the Achilles by respecting pain, avoiding sudden increases in hills or speed, and remembering that more range is not automatically better range. Retest after four to six weeks and compare both sides, your movement quality, and your running tolerance. Small daily improvements in ankle control can create a more reliable foundation for every stride.




Leave a Reply